
Good News: If you own the Neterbit NWR-M920 router, you can easily set up a VPN on it.
Even Better News: You don’t need any special knowledge or expertise to do this—it can be done in just a few minutes. Once the VPN is set up on your router, you can directly connect to the internet without any filters.
What is a Virtual Private Network (VPN)?
Before installing a VPN on your router, it’s important to understand what a VPN is. A VPN is a Virtual Private Network that allows you to access blocked websites and platforms. If you want to enhance the security of your internet connection, using a reliable and secure VPN is essential. Data exchanged through a VPN is placed inside a secure tunnel and encrypted, preventing your ISP (Internet Service Provider) from accessing your original IP address. Therefore, if you want to transmit your data securely, using a VPN is the best option.
Types of VPN Protocols
There are different VPN protocols, each with its own advantages and disadvantages. But which one is right for you? It depends on which protocol is more compatible with your router and internet service. Sometimes, you may find that a protocol does not connect or is slow. In such cases, you should try different protocols to find the best one for your needs. Protocols vary in their encryption methods, which affects their security and speed.
Read More: [Advantages and Disadvantages of Different VPN Protocols]
If you want to use a VPN on the Neterbit NWR-M920 router, it’s definitely possible. When the VPN is set up on the router, all connected devices can use it without needing additional tools. The steps for setting up the VPN on this router are simple and will be explained visually in the next section. The only thing you need is a VPN service to enter its details into the router’s settings. Everything can be done in just a few minutes, and no special knowledge is required.
How to Configure VPN on Neterbit M920 Router
Setting up a VPN on this router is easy and can be done in just a few steps.
Read More: [Important Tips for Setting Up and Configuring VPN]
Here are the steps:
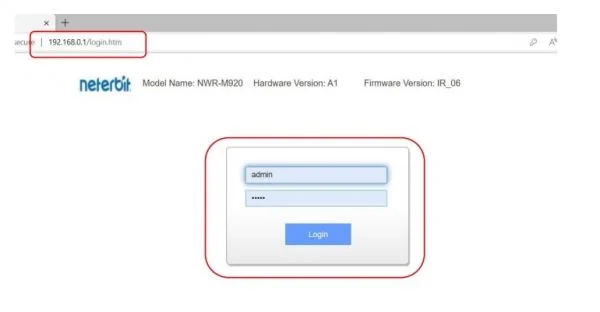
- Log in to the Router’s Admin Panel
To configure the VPN on your router, you need to access the router’s settings. Each router has its own settings, which can be accessed by entering its IP address:- Open your web browser.
- Enter the address
192.168.0.1in the browser to access the router’s settings login page. - Usually, the username and password are “admin,” but they might have been changed. Enter your username and password to log in to the settings page.
- You will see a dashboard that allows you to access different sections of the router’s settings.
- Open your web browser.
- Enter the address
192.168.0.1in the browser to access the router’s settings login page. - Usually, the username and password are “admin,” but they might have been changed. Enter your username and password to log in to the settings page.
- You will see a dashboard that allows you to access different sections of the router’s settings.
- Access the Router’s Settings
At the top of the page, there is a toolbar that gives you access to various sections:- Look for an icon labeled “Setting” and click on it to enter the router’s settings.
- After clicking, you will enter the settings page, where you can make changes.

- Go to the VPN Section
In the settings, find and click on the “VPN” section:- You will see different VPN protocols, and you need to choose one.

- Once you select a protocol, you will be asked to enter your VPN details, such as server information, username, and password.
- For example, if you want to use the PPTP protocol, click on it to display the necessary fields. After entering the details, click “Apply & Save.”

At this point, your VPN settings will be saved, and the router will notify you that it is connecting:
- Wait a few moments and do not restart or turn off the router.
- After the VPN is connected, you can check the “Status” section to confirm that the VPN connection is established.
Setting up the VPN on your Neterbit router is as simple as that. Now, you can enjoy unrestricted internet access.
Reviewing the VPN Settings on Neterbit Router
This article has guided you through setting up a VPN on the Neterbit NWR-M920 router, enabling you to connect directly through the VPN.
If you have any questions or encounter any issues, feel free to ask in the comments section, and we will assist you.